
Tips for Excel, Word, PowerPoint and Other Applications
A Quick Overview of PowerPoint
Why It Matters To You
PowerPoint is the de facto standard of presentation applications. You may hate it, you may prefer other applications, but you should never be at the mercy of someone else just because you don't know how to use it. I've put this simple overview together to identify some basic understanding of terminology and tools that we'll need later to dive deeper in the application.
Discussion
General Layout
I'm going to start out with some basic identification of what you see on the screen when you first start up a new PowerPoint document.
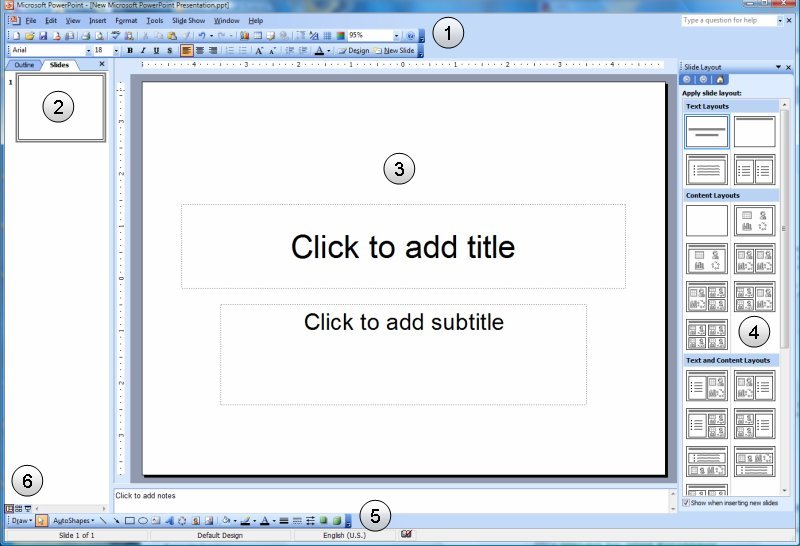
- Standard and Formatting Toolbars. These buttons are pretty much the same across all MS-Office applications. For PowerPoint documents, your Charting, Tables, and Tables & Borders buttons are here, which will call up some secondary tool bars.
- Slide Sorter and Outline Pane. This is where you will tweak the ordering of your slides. You can close this pane by simply clicking on the X in the upper right-hand corner,
- Main Window. This is where you will do all of your work on an individual slide.
- Task Pane (Slide Layout). This actually has a number of uses. Click on the top most drop down and you will see all of other functions this pane supports. I usually use it to select a slide layout. Click on the X in the upper right-hand corner to close this pane.
- Drawing Toolbar. This is the toolbar I use the most. It contains your text box and AutoShape buttons as well as all of the tools you need to organize and arragne graphical elements.
- Layout and Preview. There are three options.
- Normal View. What you see in this screenshot
- Slide Sorter View. This shows all of your slides as small thumbnails. This view lets you quickly see how your presentation is laid out and if needed, quickly rearrange slides. If you need to insert slides, this is also a good place to do so.
- Slide Show. This view shows the presentation as a slide show, with animations, effects, and transitions. If you don't use any, then it really doesn't matter, but it can still be useful as a check to see how the slide is laid out. Sometimes you don't get a full appreciation for it when you're working in Normal View.

The Drawing Toolbar
The Drawing Toolbar is the toolbar I use the most when working in PowerPoint. If you don't already have this Toolbar, simply go to the Main Menu: View: Toolbars and select the Drawing Toolbar.
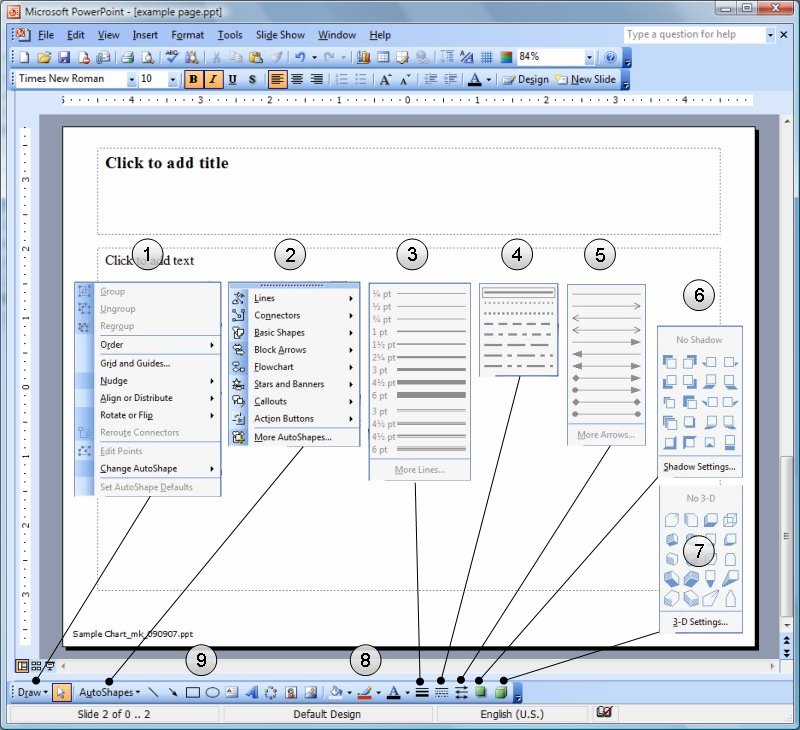
- Draw. Draw should really be though of as "manipulate". Once you have an item, the options in Draw will let you flip, rotate, nudge, align, snap-to-grid, or arrange by layer and of your page elements.
- Autoshapes. Use this to draw any non-chart, non-table, or non-text item. There are autoshapes for your basic geometric shapes, special use items like call outs, stars, and banners, as well as all of your line tools. If you need guidance on how to make basic shapes, I've written up a quick outline below.
- Line Width. This option lets you set the thickness of your lines.
- Line Styles. This section lets you set the style of your line. You can make them solid, dashed, dotted, etc.
- Arrow Styles. There are a number of default arrows styles, but if you need something more specific, click on the More Arrows and you can somewhat customize the starting and ending arrow styles as well as the size and shape of the arrow.
- Shadows. I don't use shadows much, but this is where you would enable and modify them. Just remember that shadows require your object to have a fill. Typically, I only use shadows for backer boxes.
- 3-D settings. I use these even less than shadows.
- Fill, Line, and Font color chooser. If you want to change the color of your fills, lines, or text, you'd use these three buttons. Within the Fill options, you can also choose blended transitions and set transparency levels, which can be quite useful.
- Standard shapes and Text Boxes. These list the most common standard shapes most people need.
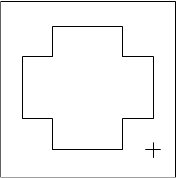
Creating Basic Shapes
To create a basic shape, select an AutoShape or click on the Text Box tool and your cursor will change into a cross. Go to your insertion point, click and hold your left mouse button, drag the bounding box to the size you want, and then let go. Here, I've made cross.
If you click on a draw shape, you will see your bounding box with white balls (grab handles) at the corners and on each edge. Grab these to resize an object. If you want to resize an object but keep the same proportions, activate the object, hold down SHIFT, and then use one of the corner grab handles to resize.
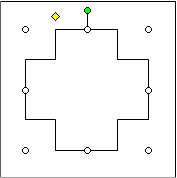
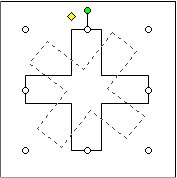
Some objects have a yellow grab handle. This allows you to change the shape of an item like a cross or an arrow. Grab this the same way you'd resize an object and play around with it a bit.
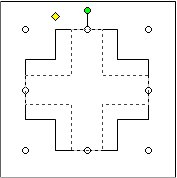
Lastly, you might see a green grab handle. This allows you to rotate an object. If your object doesn't have this, you also find the rotation tool in Draw: Rotate or Flip: Free Rotate.
If your interest in the Drawing Toolbar is now piqued, remember that you can also further customize the toolbar by going to the Main Menu: Tools: Customize: Commands tab and drag specific commands out of the Draw or AutoShapes menu onto the main toolbar.
Controlling The Shape and Placement of Your Shapes
You may not want to freehand the size and shape of your shape. In PowerPoint, you might want your shape to conform to the grid, even if it isn't currently activated. Luckly, there are a number of tools to help you with this:
- If you hold down SHIFT while first describing an object, you'll be able to resize the object but keep the same proportions. Select the type of shape you want to insert, hold down SHIFT, and then use your mouse to define the object.
- If you hold down SHIFT after a shape is already defined, then you'll limit yourself to resizing on the horizontal axis-only, vertical axis-only, or proportional resizing, depending on what grab handle you use.
- If you hold down ALT while resizing an object, your shape will snap to the closest grid line. This also works when you have disabled the snap to grid function, which can be very useful.
- If you hold down CTRL and then select an object, you'll make an exact copy which you can then drag to another location. If you've grabbed a grouped object, you'll make a copy of the whole group.
- Not surprisingly, If you hold down CTRL + ALT and then select an object, you'll make a copy which will snap to the grid line when you drag it to another location. This is nice if you're creating a large number of similar objects, perhaps for an org chart.
Notes
| Last updated | 5/17/08 |
| Application Version | PowerPoint 2003 |
| Author | Michael Kan |
| Pre-requisites | None |
| Related Tips | Fill Colors |