 Graphics Card Installation
If you have a Nubus card, you may need to install the manufacturer's drivers in order for them to work properly. For some, they may work very slowly without the driver. For others, they may not work at all. Better to install the drivers while you can still see!
Pull up on the small tabs at the back of the computer. Each of them should snap free, and the entire top of the case should rock forward. Rock it forward until it comes free of the computer, and set it aside.
Remove any residual static electricity your body may be carrying by touching the power supply (the big metal box at the back of the computer). Better yet, buy and wear an anti-static wrist strap. Also, remove any wool sweaters you may be wearing and banish the cat from the room until you're finished.
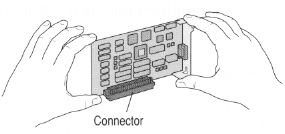
This is a picture of a Nubus card. The HPV and AV cards use a similar (but not identical) form factor, so I can use this series to images to illustrate. In most computers, expansion cards plug in vertically, so that the card sits perpendicular to the floor. | To accommodate the 6100's flatter form factor, Apple designed adapters which allow expansion cards to sit sideways, or parallel to the floor. Note that there are two types of these adapters--one for Nubus cards and one for PDS cards (i.e. the AV and HPV cards) 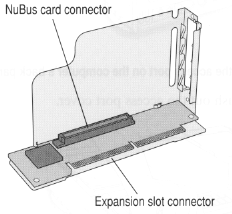
The adapters consist of two parts--1) a stamped metal piece and 2) a little printed circuit board (shaded in the picture). This little board has two connectors. The AV, HPV or Nubus card plugs into the adapter perpendiculary (into slot marked "Nubus card connector", and the adapter's "Expansion slot connector" plugs into the PDS slot on the motherboard. | Note that this picture is of a Nubus-PDS adapter, which is slightly different than the PDS-PDS adapter. The Nubus adapter one has a Nubus connector, and it has some circuitry on it. The PDS adapter has a PDS connector, and no circuitry. This is important, as it is why Nubus cards cannot be used with the G3 upgrade card. The little circuit board in a PDS adapter has no electronics on it; it's just a pass-through connector which can be replaced by a G3 card. 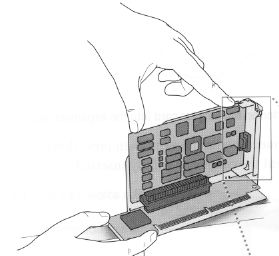
This is a picture of the Nubus-PDS adapter with a Nubus card installed. An AV or HPV card would fit in a very similar way. | The geniuses over at Newer and Sonnet designed their G3 upgrade cards to have the same form factor as the little circuit board on the adapter! If you have a G3 card, remove the little circuit board from the adapter and put the G3 card in it's place. If you want to use a PDS card with a G3 card, but you don't have the PDS adapter, it may be possible to use the mechanical bracket from Apple DOS card adapter. I have email from one reader who has done this successfully. 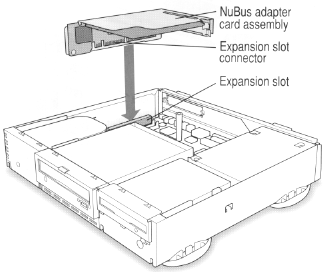
So to install an AV or HPV card, simply plug the AV or HPV card into the G3 card/adapter assembly, then plug the whole shebang into the PDS slot on the motherboard. |
|
That's it! Plug in your monitor and fire it up.
 Back to the 6100 Graphics Page
Feedback? Corrections? Mail me @ steven@kan.org (Navigator users) or steven@kan.org (everyone else)
Thanks, and please come back soon!

